Australia-Wide Delivery
Discreet Shipping
High Quality Products
Buy now pay later
Customer Support
Do you know that the most common mistake of many beginners when propagating plants is overwatering? It's easy to think that newly propagated plants need a lot of water to establish themselves, but in reality, too much water can lead to rotting and other issues like fungal infections.
Don’t make this big mistake again! Benchmark Hydroponics is here to provide a step-by-step guide on how to propagate plants to help you master this planting method.
Plant propagation means forming new plants from a single parent plant. There are 2 main types of propagation: sexual and asexual.
For sexual propagation, plants multiply in the wild through sexual propagation, which involves the combination of an egg from a female plant with pollen from a male plant. This union results in the creation of a seed, which then grows into a new plant.
Asexual propagation method
Asexual propagation is taking a part of a parent plant, such as a leaf, stem, or root, and causing it to grow into a new plant. This can be done in several ways, such as stem cuttings, leaf cuttings, division, and grafting. Gardeners often use asexual propagation to propagate plants hard to grow from seed or create clones of plants with desirable characteristics.
Plant reproduction involves the process by which plants produce offspring, ensuring the continuation of their species. This can occur through sexual reproduction involving the fusion of gametes or asexual reproduction, where new plants develop from vegetative parts.
Meanwhile, propagation refers to the human-managed process of creating new plants from existing ones, either sexually or asexually, often for agricultural, horticultural, or landscaping purposes.
Each plays distinguished roles in growing your plants, check the table below for the differences:
| Aspect | Plant Reproduction | Plant Propagation |
| Definition | The natural process of producing offspring or new plants | Human-controlled process of creating new plants |
| Methods | Sexual (seeds, spores) Asexual (vegetative, etc.) |
Predominantly asexual (cuttings, layering, grafting, division, etc.) |
| Occurrence | Occurs in nature as part of the plant life cycle | Require human intervention |
| Purpose | Contributes to species survival and genetic diversity | Often to replicate desirable traits or produce large quantities efficiently |
| Techniques | Pollination, fertilization, seed development | Cuttings, layering, grafting, division, etc. |
| Application | Natural ecosystems, wild environments | Gardening, agriculture, horticulture, landscaping, research, etc. |
When mentioning plant propagation, there are 2 common methods: stem cuttings and division. Below is a step-by-step guide on how to propagate comprehensively:
What you'll need:
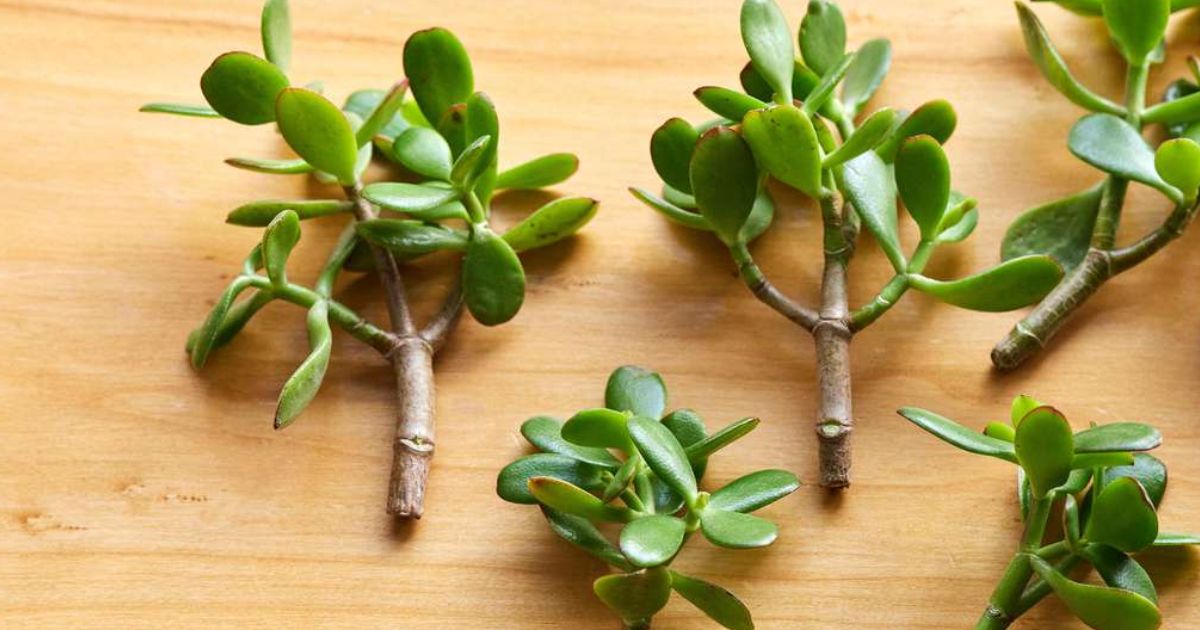
To take the cuttings from parent plants, choose a healthy part of the parent stem that is 3 to 6 inches long. Use a pruner or sharp knife to make an angled cut at 45 degrees. This will help the roots grow better. It's best to take cuttings from the newest growth on the plant. Ensure each cutting has at least 2 or 3 sets of leaves.
There should also be one growth node on the stem (a bump from which new leaves or flowers grow) that can be buried in the growing medium. This node will develop roots and the cut end of the stem.
Remember that propagation might not work the first time, so take at least three cuttings as backups to ensure success. Woody plants can be challenging to grow, so it's best to take six or more cuttings.
When taking a stem cutting, remove the leaves from the bottom node. Simply snapping them off will do. However, keep at least three to four leaves on the stem. If necessary, apply a gel or powdered rooting hormone to the end of the cutting and the area where you removed the leaves.
Rooting hormones can stimulate the process, but not all plants need them (for example, Spore-forming plants, Bryophytes, or Angiosperms). If using powdered hormone, moisten the stem before rolling it in the powder. If you're using gel hormone, just dip the end of the cutting into it.
To propagate cuttings and start new plants, you will need a planting tray or small pots. Fill them with soilless potting medium, such as seed-starter mix or vermiculite.
Use a pencil to make a hole in the medium and insert the end of each cutting into the hole. Gently press down on the medium around the stem to keep it upright.
When you're trying to grow new plants from cuttings, give them the right environment to thrive. Most plants need a mix of shade and sunlight to take root, so it's best to place them where they receive both.
Keep the soil moist but not too wet, and keep the temperature warm and humid. Check on the cuttings every two weeks to see if any new leaves or roots are growing. If you see flowers starting to bloom, it's best to remove them so the plant can focus its energy on growing roots.
Some plants have specific needs (such as Parlor Palm, Prayer plant, Nerve plant…), like extra warmth or humidity, so it's a good idea to research each type of plant you're trying to grow.
When a cutting shows new leaf growth along its stem, the roots develop healthily. Gently tugging on the cutting lets you tell if the roots are developed enough. If you feel resistance, the roots are ready.
Then, move the cutting to a new pot with fresh potting soil. Use a small trowel or a large kitchen spoon to transfer the rooted cutting.
>>> See more: How To Propagate A Peach Tree: Basic Steps for Beginners
What you'll need:
Most perennials are best divided in spring or fall when actively growing but not flowering. Bulbs can be divided after flowering has finished and the foliage starts to die back.
You must carefully loosen the soil around the base of the plant with your spade or fork. Lift the entire plant gently, trying to disturb the roots as little as possible.
Gently pull apart the sections by hand for plants with clumps. For tougher root systems, use pruning shears or a knife to carefully categorize the plant into sections, each with healthy roots and shoots (eyes for bulbs and tubers). Aim for sections that are a good size—not too small or crowded.
Pro tip: You might see smaller bulblets around the main bulb when dividing bulbs. In particular, you can generate new plants from these bulblets by carefully separating them and putting them in a new pot.
There are two common methods for replanting, which are:
Remember to regularly water your newly divided plants, especially during hot weather.. While they recover, keep them in a bright and indirect sunlight location. .
>>> See more: How To Propagate Fig Tree: A Comprehensive Guide By Experts
After knowing how to propagate plants, you should learn how to take care of them afterward:
Below are 5 basic steps to propagate cuttings
You can propagate with roots or seeds, but the easiest and most popular method is to transfer or cut an existing plant into soil or water and let it grow a new root system. Propagating with cuttings offers a lesson in plant biology.
These seven methods include seed propagation, cutting, layering, division, grafting, budding, and tissue culture technique.